Finally...Proof that the car does run!
Warning: Sound track is atrocious since it's
all wind at speed on the video recorder's built in mic.
First off...a reminder about the first lap.
Saturday, November 8, 2008
Wednesday, November 5, 2008
"Blew the Head" 3x now
Well, I'm getting pretty good at rebuilding the top side of the engine now.
Race #1, Practice #1, Portland International Raceway
3 laps and major overheat due to BAD pinging. #4 cylinder has H2O in it. #1 is steamed.
Water temp went to 250 degrees sitting in the "Hot Pits" chatting with the stewards
about the "awful pinging sound that engine is putting out".
This overheat resulted in the gasket near #4 to die. #1 was close to doing the same.
Cause: Altered Motors, who I enlisted to help because of the pending race,
set the timing to 54 degrees advance. Not good. Now I double check. Should be 25-ish.
Result: No permanent damage to block/head seen. Rebuilt in 4 hours.
Race#2, Practice #1, Pacific Raceways, Seattle
5 Laps into 1st practice, temp goes to 240 and steam is hissing out the overflow tank.
Pulled plugs. Cylinder plugs #s 1 and 4 have water on them.
Steam cleaned them...steam was coming out of the plug hole too.
Cause: Sticky thermostat and suspected head bolt torque not sufficient.
Result: No permanent damage to block/head seen. Another head gasket bites the dust.
Tore down and rebuilt in 2.5 hours. Doubled the washers on the head bolts to take up some of
the suspected yielding of the bolts. Gotta get new bolts or stud the block (better option).
Made first novice race. Start went to full-course yellow for two laps right away.
Second lap, head gawd awful popping/banging noise like a valve dropped and was being
forged by the piston. Pulled into pits. Engine guy said it was a smog port plug that had come
loose and the exhaust was leaking out there instead of going through the manifold.
"No worries, go back out!!!" I did and hauled @$$ for some 15 mins. Then it just quit with half a lap to go :-( Turns out the ground line on the dizzy came off. But. I got mostly 5s, some 4s on my Senior Driver reviews (out a best 5) YEAH! One race signed off on!
"Race" #3, Session #4- Alfa Romeo High Performance Track day, PIR
Temp suddenly went from 190 to 225 degrees as it started to ping through turns 8/9.
I immediately shut her down and pulled into my pit (coasting). temp went to 230 and
she drank another 2 gallons of water during a futile attempt to cool it off.
Yes, that's a bad sign. #4 spark plug was steam cleaned and steam was coming out of the
spark plug hole. #1 looked suspicious.
Cause: Switched to premium pump gas. It has 10% ethanol.
Fuel (alcohol) predetonated in the cylinders effectively advancing the timing way early.
Result: Day over and learned that I need to richen up the carbs a lot when going to pump
gas. Another rebuild!
Process for replacing a blown head gasket on the Datsun R16 motor.
1. Drain water from motor/radiator. (there's a block drain plug too, if your motivated)
2. Remove water temperature sensor and second head plug.
(2nd orifice originally allowed a coolant line connection to the intake manifold).
3. Drain oil from motor and cooler (it'll have water in it too).
4. Remove spark plugs wires and plugs.
5. Remove thermostat housing, thermostat from head.
6. Remove alternator tension rod from head.
7. Un-couple exhaust header from exhaust piping.
8. Remove valve cover breather tube and then valve cover.
9. Slightly loosen, in 2 counter clockwise sequences, the intake/exhaust manifold nuts.
10. Once all Ex/Int nuts are loose, remove them and the washers completely.
11. Slip intake completely off studs, just enough to move out of the way of the exhaust manifold.
All the fuel lines and cables can stay as-is, attached to the intake/carbs.
12. Slip Exhaust manifold off studs. This can fall since it's also unattached at the bottom too.
13. Starting from one end, barely loosen the rocker shaft tower bolt. Move to the next and then in sequence to loosen a small amount on each one of the 4 tower nuts. The idea is to gradually loosen the nuts so that the pressure from the valve springs isn't allowed to tweak the rocker shaft on any one nut loosening effort. Remove all four nuts and washers.
14. Carefully lift off the rocker assembly and set aside.
15. IMPORTANT: Remove the 8 rocker push rods, but keep these in order so that you can put them back exactly in the positions (holes) they came from.
16. The head is Aluminum (on mine) and the block is cast iron, so you need to be careful not to deform the head in the bolt loosening effort. So, as was done in step 13, you want to loosen the 10 head bolts in a similar fashion. Starting from the middle set and working outward counter-clockwise. Three cycles of small loosening efforts should release enough pressure equally so as to not tweak the head. Remove the bolts noting where the one longer bolt comes from. Should be port side of #1 cylinder.
16. Lift off the head. the valve cover studs have a tendency to catch the throttle cable tho. Expect some water to be in the head still.
17. Remove the head gasket and assess the damage.
18. Soak up any water in the cylinders right away.
19. Spray the cylinders and block face with a lube to prevent rust from starting (WD-40 maybe).
20. Assembly is kinda the reverse, but not exactly. More on that, with pics, specs, later.
The starting point and patient.

A Royal Purple 0W-30W oil milkshake inside the valve cover.

Valve cover and rocker assembly.

Manifold bolts removed from studs. Intake slipped off and outta the way.
Exhaust manifold, loose at the down pipe too, is next to come off.

Push rods removed, sequenced for reassembly later, and head removed.
One (closest), and 4 show steam cleaning signs. #s 2and 3 look normal.

#4 clean, 3 has some water intrusion signs, 2 is dark with normal burn residue.

Another view.

Burnt gasket. Water passage and head bolt holes in bottom left.

#1 almost went completely, but not quite. Some steaming seen.

Cylinder block with piston #1

Block, piston #4. geez, there's still water in it!

Poor head gasket...sorry I did that to you. Head side.

Block side


Offending bolts. These have yielded over time and don't hold a necessary torque.

Pics of the rebuild coming soon to a blog near you.
Tuesday, September 2, 2008


Sunday, August 10, 2008
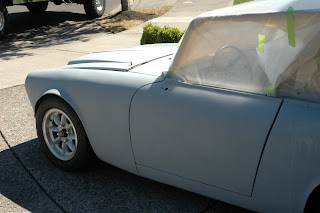
Paint's Done !!!
Racing to the finish so to speak. I have 5 days to get the stickers on, install the electrical system, fluids and fire it up for the race ICSCC race at Portland International Raceway on Saturday August 16th.
Holy s#^@ Batman....we're not gonna make it!
White and Blue are now under 3 good thick coats of clear. Let her cure a day or two and put on the numbers, DATSUN logo, and various others. My assigned Novice race number is 312. Tried registering as #311 as in the car model SPL311, but I figure "311...312...whatever it takes".
Anyway, I'll be trying to make it regardless.


Wednesday, August 6, 2008
Paint time!!!
A few more bondo additions, then sand smooth. Lots of sanding. Then primer. Thirteen hours worth of hand sanding including the post-primer sanding phase to smooth out the orange peel surface I created trying to prime. It wasn't me actually...its was inferior air supply (and learning curve).


Lesson learned...there is no substitute for displacement. Usually a phrase aimed at engines, but I'm applying it to compressor motors now. A little 6.2CFM/8 gallon compressor cannot drive an HVLP gun to give any sort of decent surface finish. Even if the gun does say only 4-6 CFM required, you need 3x that. The gun just cannot atomize the paint properly using a wimpy compressor; especially a thick filler primer with a 1.5 gun tip. Adding 20% more reducer to the paint helped tho. Leave the small stuff for nail guns.
So, a few dollars later, the 220V 16.4CFM compressor is on line and functioning very well. I painted 4x as much in 6x less time with way better surface finish results. Happy worker bee finally:-)
The culprits:
WIMPY WIMPY :-( HEFTY HEFTY :-)


Some pics of the car after post-primer sanding and paint dust wash. 


Sunday, July 20, 2008
Major Progress This Time
Oil Cooling system.... done
Fuel System... done
Fire system....done (c'ept for last 2 fittings in dash/trunk) awaiting dash/rear firewall.
Battery Box.....done
Tranny tunnel cover...done
Shifter Cover...done
Driveshaft Install....done
Rear Brakes....done
Dash pour...done
Ok, now the pics !!!


Canton Oil cooler bypass plate, Aeroquip plumbing, and B&M Cooler.


Safecraft 5lb Halon System. Will have the pull handle mounted to the side of the tranny tunnel.
Custom non-conductive light weight battery box (UHMW).
Super light weight jet-ski Odyssey battery (695 CCAmps).
Custom home-fabbed aluminum tranny tunnel with shifter inset. Floor pad on driver's side too.


2-Part poured foam dash. Swells a lot!


Shaved to desired contour. Next is to spray contact adhesive, lay on headliner foam, and smooth on the black suade cover material.


Fuel cell, pump, and filter. Fire supression nozzle waiting for rear deck cover before final fitment.


Floor pan and tranny tunnel plates. Nice swirls in the finish eh?

Next up...ELECTRICAL !!! AAAAAAAAAAH!!!!!

Next up...ELECTRICAL !!! AAAAAAAAAAH!!!!!
Subscribe to:
Posts (Atom)